How to build a WordPress site on Amazon AWS

Table of Contents
1.
Launch an EC2 Instance
An instance is a copy of an Amazon Machine Image (AMI) running as a virtual server in the AWS cloud. There are different types of instances. An instance type is a specification that defines the memory, CPU, storage capacity, and hourly cost for an instance. Some instance types are designed for standard applications, whereas others are designed for CPU-intensive, memory-intensive applications, and so on.
Open the AWS Management Console here:
Click the Sign In to the Console button:

NEXT: Sign in. If you’ve used Amazon before, setup takes zero seconds since you’ll one using your normal shopping account.

On the right side of the menubar is a Region dropdown (just to the left of the Support dropdown). Be sure it has the same setting whenever location is an option. Doing this will make page loads faster. You can ignore this issue when the dropdown is entitled World.

Always use the same region.
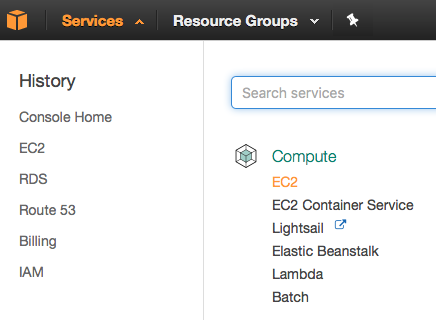
To open the EC2 Dashboard, go to the menubar and select Services > EC2:
You will then see the EC2 Dashboard:
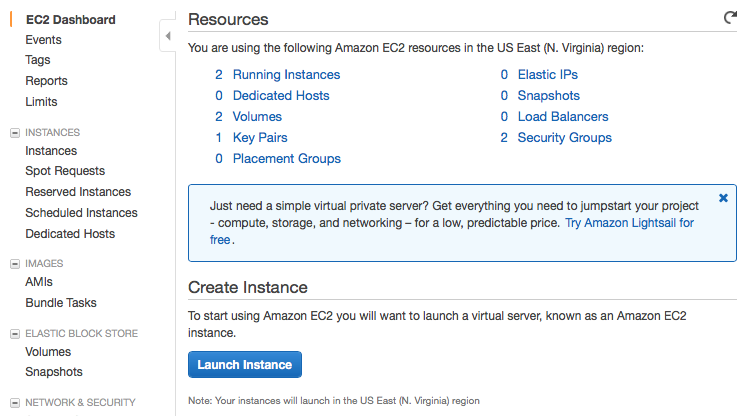
NEXT: Click the Launch Instance button. You will see a screen asking you to choose an Amazon Machine Image:
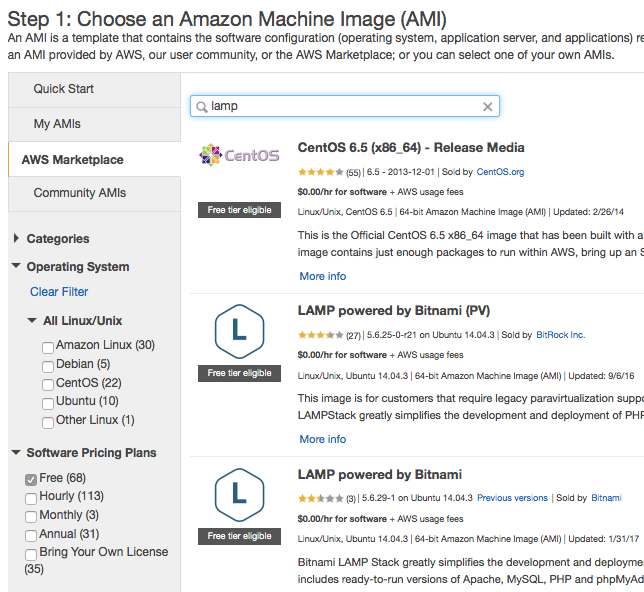
Just type “lamp” in the search box and click Free in the sidebar (under Software Pricing Plans) and pick any of the free LAMP stacks.
An EC2 image gives you the machinery you need to run a server, but you also need necessary software infrastructure. What software is required? Just the bare bones:
- an operating system (Linux)
- a webserver (Apache)
- a database server (MySQL)
- and a programming language (PHP)
Together, these are called a LAMP stack. This is the minimum that WordPress needs in order to function. Such software bundles are saved, stored, and swapped among users on Amazon AWS as Amazon Machine Images. An AMI is similar to a disk image—a file containing the contents and structure of a disk volume or of an entire data storage device, formatted, with all software ready.
So click the Select button next to the free LAMP stack of your choice. Try LAMP powered by Bitnami.
NEXT: Click Continue at the bottom of the Pricing Details page.
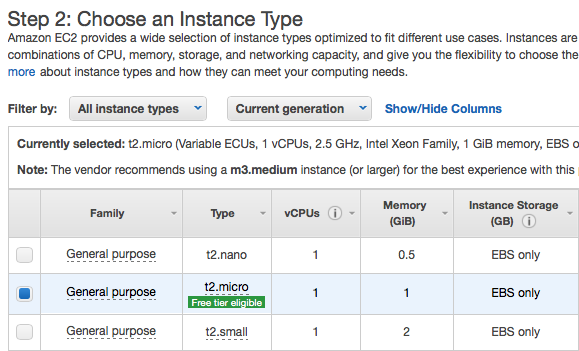
NEXT: Select t2.small in the table of options:
NEXT: Then click Review and Launch
NEXT: Click the Edit security groups link (it’s on the right)
NEXT: Click the Select an existing security group radio button
NEXT: Select the default security group
NEXT: Click the Review and Launch button
NEXT: Click the Launch button
For the key pair dialog, choose an existing pair if it exists or create a new one.
It’s a good idea to make a note—using Notes, TextEdit, or Tinderbox—so you can put of all your Crucial Website Data in one place. We can call this your CWD file. Add the Key pair name of your EC2 Instance to your CWD.
NEXT: Click the Launch Instances button
Congratulations.
NEXT: Give the instance a name. Click the pencil icon in the Name cell of the Instance row in the table and give it a name. Add the Key pair name of your EC2 Instance to your CWD.
NEXT: With the Instance row in the table still selected, click the Description tab below. Look for Public DNS (IPv4) and add it to your CWD.
Key Pair • mapkey
Public DNS • ec2-***.compute-1.amazonaws.com
2.
Add SSH and MySQL to default Security Group
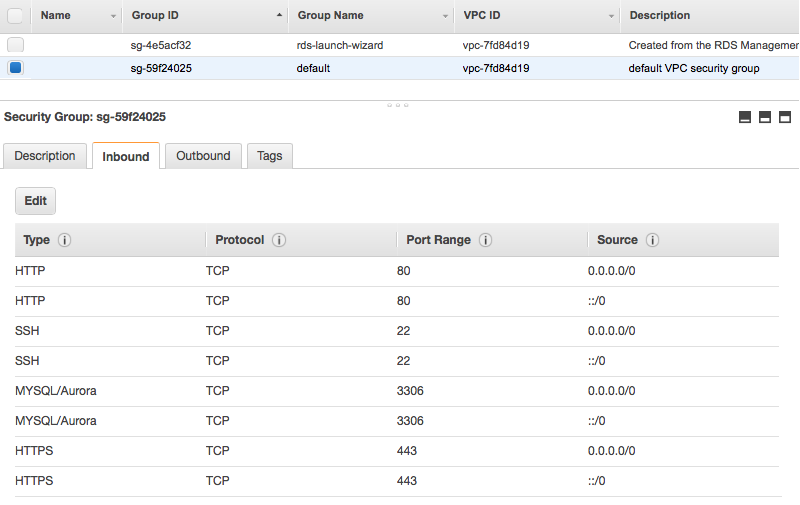
Now you need to add the MYSQL/Aurora rule to your Security Groups settings.
Make sure you’re still in the EC2 Dashboard. If not, go to the menubar and select Services > EC2.
NEXT: In the sidebar click Security Groups
NEXT: Then select the default group row:
NEXT: Click the Inbound tab and then click the Edit button
NEXT: Click the Add Rule button. Set the Type of the new row to MYSQL/Aurora. Set its Source to Anywhere. Then click Save.
NEXT: Click the Add Rule button. Set the Type of the new row to SSH. Set its Source to Anywhere. Then click Save:

3.
Make a DB Instance
To open the RDS Dashboard, go to the menubar and select Services > RDS:
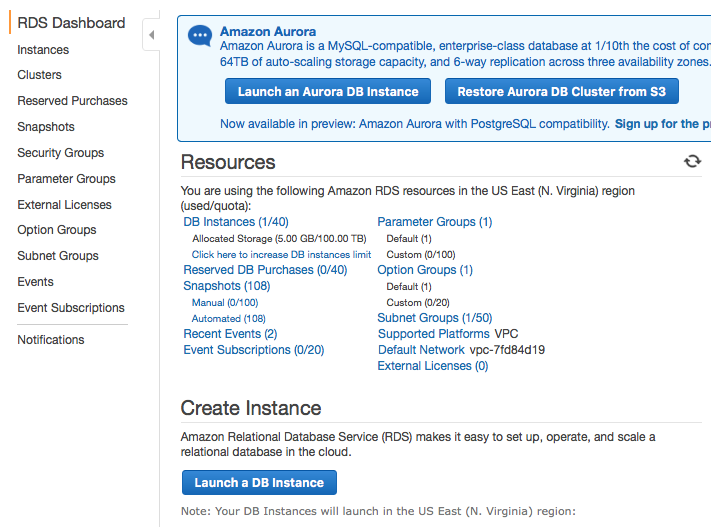
NEXT: In the sidebar, click Instances
NEXT: Click the Launch DB Instance button. This will take you to the Select Engine screen:
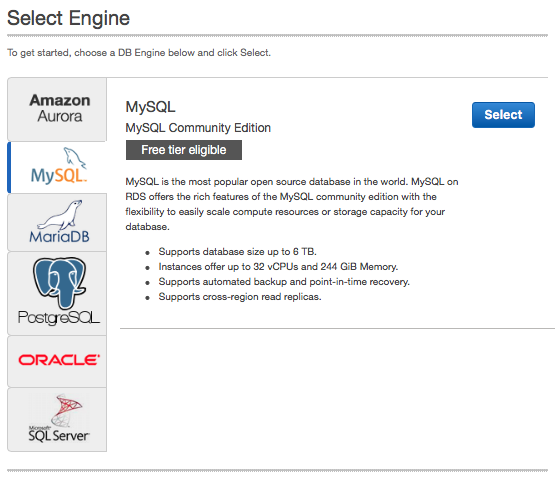
Choose MySQL from list then hit the Select button. This will take you to the Do you plan screen:
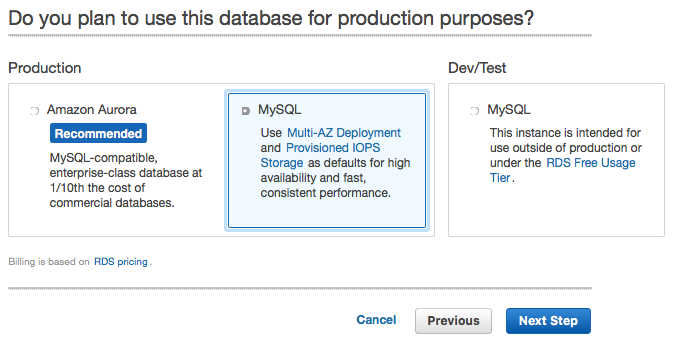
Choose Production > MySQL then click the Next Step button. This will take you to the Specify DB Details screen:
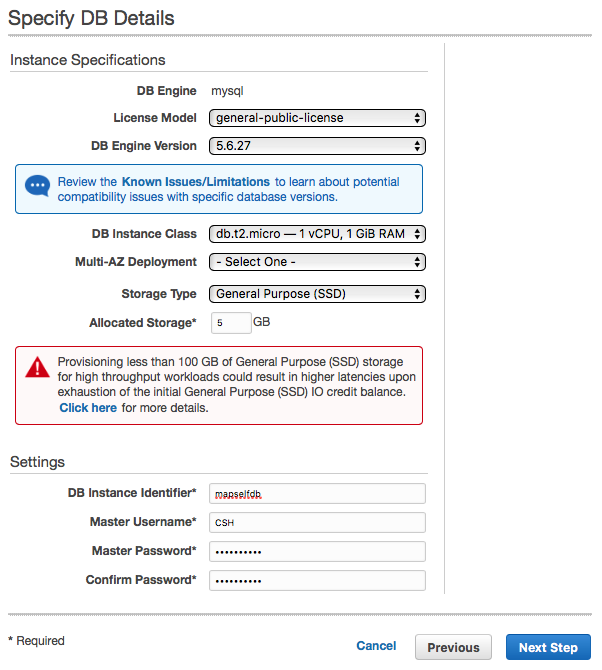
Now make the following changes:
- Change DB Instance Class to
micro - Set Multi-AZ Deployment to No
- Keep Storage Type at General Purpose
- Keep Allocated Storage to 5GB (NB: You cannot LOWER your storage once it has been set)
- Set DB Instance Identifier to the name for your DB instance (our example: mapselfdb). Add the DB Instance Identifier of your DB Instance to your CWD.
- Set Master Username to a username (our example: CSH). Add the Master Username of your DB Instance to your CWD.
- Set your Master Password. Add the Master Password of your DB Instance to your CWD.
- Click the Next Step button. This will take you to the Configure Advanced Settings screen:
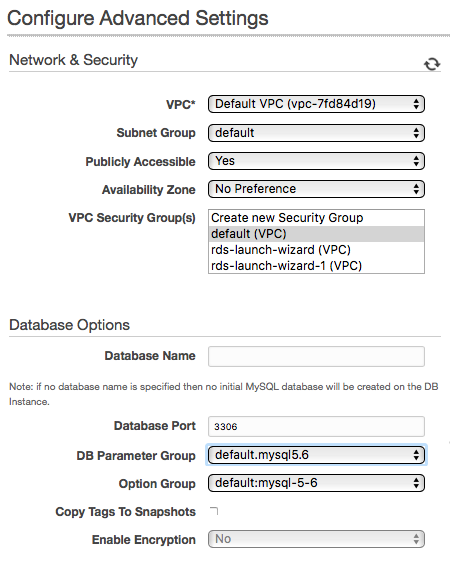
In the VPC Security Group(s) field, select default (VPN).
Leave Database Name blank unless you want to create an initial MySQL database.
Click the Launch DB Instance button:
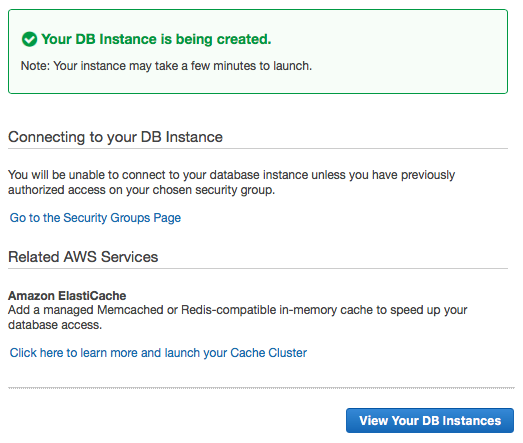
NEXT: Click the View Your DB Instances button:
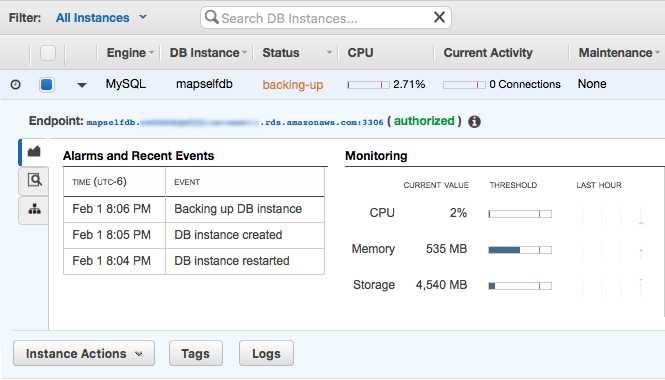
After the Status of your new DB Instance has changed from creating to available, look for the Endpoint and copy this string (by clicking on it and selecting Copy from the contextual menu). Paste this string—minus the trailing colon and 4 digits—to your CWD.
DB Master Username • CSH
DB Master Password • ***
DB Endpoint • mapselfdb.***.rds.amazonaws.com
4.
Make a DB subdomain
To open the Route 53 Dashboard, go to the menubar and select Services > Route 53.
NEXT: In the sidebar, click Hosted zones:
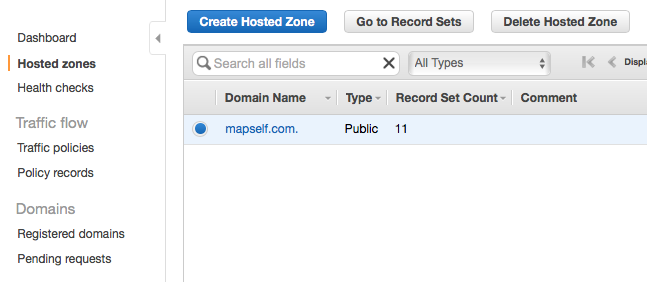
NEXT: Select your desired domain and then click the Go to Record Sets button:
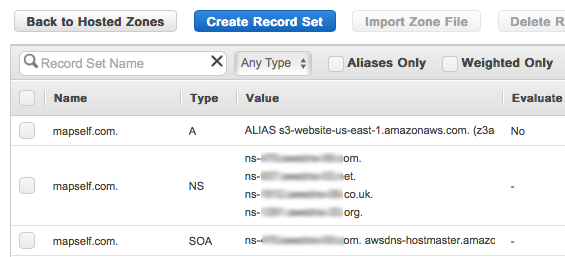
NEXT: Click the Create Record Set button:
Now make the following changes:
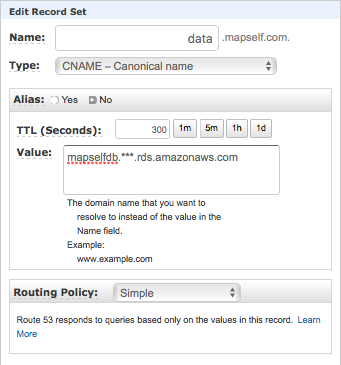
- Give your subdomain a Name (such as data)
- Set Type to CNAME
- Keep Alias at No
- In Value, paste the Endpoint of the DB Instance (mapselfdb.***.rds.amazonaws.com)
In our example, data.mapself.com will be the host when using Sequel Pro (or the WordPress admin screen).
5.
Make a WordPress subdomain
If you are not already in the Route 53 Dashboard, go to the menubar and select Services > Route 53, and then click Hosted zones in the sidebar:
NEXT: Select your desired domain and then click the Go to Record Sets button:
NEXT: Click the Create Record Set button:
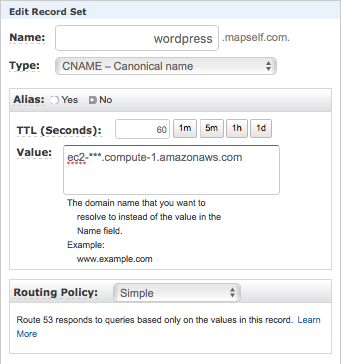
Now make the following changes:
- Give your subdomain a Name (such as wordpress)
- Set Type to CNAME
- Keep Alias at No
- In Value, paste the Public DNS of the EC2 Instance (ec2-***.compute-1.amazonaws.com)
6.
Prepare Cyberduck
To upload files to your new WordPress server, we will be using Cyberduck. You can download Cyberduck here:
Launch Cyberduck and go to menubar Bookmark > New Bookmark.

- In the topmost dropdown, choose SFTP (SSH File Transfer Protocol).
- For Server, enter the (full) subdomain (our example: wordpress.mapself.com)
- For Amazon Linux, the user name is always ec2-user. So for Username, enter ec2-user.
- For SSH Private Key, select Choose and locate the pem file.
7.
Change permissions of the www directory
Now change the permissions of your www directory.
First, however, we need to change the permission of your pem file or else ssh will refuse to use it. Find the file in Finder and do Get Info. Click on the Lock icon (in the lower right) and change the Privilege of everyone to No Access—and delete all other privileges.

I also deleted the staff line by selecting it and clicking the minus-sign button.
Open Terminal and type:
$ ssh -i [path to pem] [EC2 instance hostname]
Constructing this string is actually easy.
- Type ssh -i (leave a space after the -i)
- Then drag the pem file onto your Terminal window
- Then type ec2-user@
- Then copy the EC2 Public DNS from your CWD file and paste it in.
- Then hit RETURN.
(By the way, to get access to root so you can list directory contents, just type cd / RETURN.)
For example:
$ ssh -i ~/Desktop/BLOG_STUFF/Tinderbox_exports/key_pairs/mapkey.pem ec2-user@ec2-***.compute-1.amazonaws.com
Finally, to change the permissions of your www directory, type:
$ sudo chmod -R 777 /var/www
That’s it.
8.
Cyberduck: edit http.conf and .htaccess
Launch Cyberduck.
Click the More Options dropdown triangle and set Path to root (/).
Now take a good look. FYI, your website files will be inside /var/www
Now use the triangles to navigate to /etc/httpd/conf. To make things visually nice, double-click on /etc/httpd when you find it. Your window will look like this:

Notice the path in the menubar.
Now CTRL-click on http.conf and choose Edit with TextEdit.
Scroll to the bottom of the file in your text editor and locate this:
#<VirtualHost *:80>
#    DocumentRoot /www/docs/dummy-host.example.com
#    ServerName dummy-host.example.com
#</VirtualHost>
Now change it to this:
<VirtualHost *:80>
    DocumentRoot /var/www/mapself.com
    ServerName wordpress.mapself.com
</VirtualHost>
Now make your website root directory inside /var/www. Mine is called mapself.com. To do this, navigate to /var/www and then do File > New Folder:

I just made a new folder, mapself.com.
Now, in order for WordPress admin to be able to create the wp-config.php file inside the new folder, we need to change its permissions via Terminal. To change the permissions of your new directory, type:
$ sudo chmod -R 777 /var/www/mapself.com
Now you can either …
- Drag your WordPress website contents into that folder, or
- If you want a fresh install, download the latest version of WordPress from here: https://wordpress.org/download/.
If you drag an old WordPress folder, make sure you delete the wo-config.php file from the root.
Now make your .htaccess file inside that new directory. Copy and paste the following into it:
AddType application/x-httpd-php .html .htm .php
<IfModule mod_rewrite.c>
RewriteEngine On
RewriteBase /
RewriteRule ^index\.php$ - [L]
RewriteCond %{REQUEST_FILENAME} !-f
RewriteCond %{REQUEST_FILENAME} !-d
RewriteRule . /index.php [L]
</IfModule>
To do this, first do View > Show Hidden Files. Then, inside the new directory, do File > New File and name it .htaccess. Now CTRL-click on .htaccess and choose Edit with TextEdit. And paste in the above text.
9.
Edit your DB with Sequel Pro
To edit your WordPress database, we will be using Sequel Pro. You can download Sequel Pro here:
Now enter your connection details:

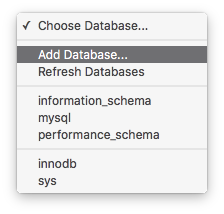
There is no database yet, so let’s make a new one. Click on the Choose Database … button in the upper left and select Add Database …:
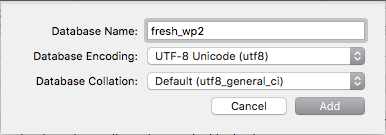
Now give the database a name and set the Encoding to UTF-8:
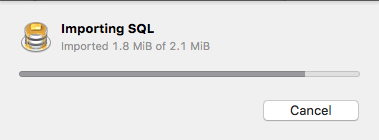
Now upload your old database (which you exported and downloaded from your old website). To do this, go to File > Import …, navigate to the proper sql file, and click Open.
Now locate wp_options and change the following (by option_id):
| option_id | option_name | option_value |
|---|---|---|
| 1 | sireurl | http://wordpress.mapself.com |
| 37 | home | http://wordpress.mapself.com |
| 56 | upload_path | /var/www/mapself.com/wp-content/uploads |
10.
Restart Apache
In Terminal, type:
$ sudo service httpd restart
11.
Install WordPress
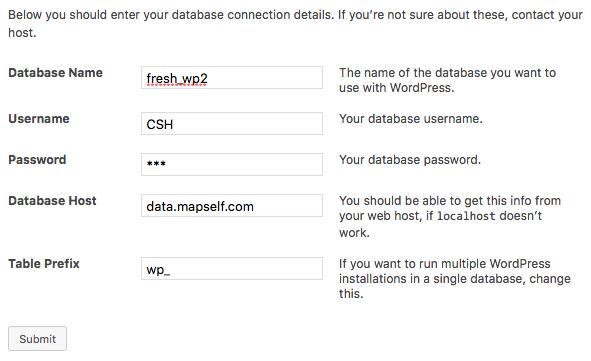
In your web browser, type
wordpress.mapself.com/wp-admin
Then enter the relevant info:
Then log in using your WordPress username and password.
Now go to Settings > Permalinks and click Save. This will repair all intra-site links.
That’s it. You have successfully installed a WordPress site on Amazon AWS!